

Getting your bearded dragon’s tank set up properly is the single best investment you can make in their health and happiness. A well-built enclosure does more than house your dragon — it gives them the heat, light, space, and environment their bodies were designed to thrive in. Get it right at the start, and you’ll save yourself a lot of stress (and money) down the track.
The good news is that setting up a bearded dragon enclosure isn’t complicated once you know what you actually need. The trickier part is filtering through the conflicting advice you’ll find online and in pet shops — much of which is still based on outdated keeping methods.
This guide walks you through every step in the right order: choosing the enclosure, sizing it correctly, installing lighting and heating, picking the right substrate, adding hides and decor, and testing everything before your dragon ever sets foot inside. By the end, you’ll have a setup that closely mimics the natural Australian environment bearded dragons evolved in — exactly the approach we recommend across the site.
What You’ll Need: The Bearded Dragon Setup Checklist
Before you start, here’s everything you’ll need to gather. We’d suggest having all of this ready before bringing your dragon home — setting up while a stressed beardie sits in a temporary container isn’t ideal for either of you.
- An enclosure: minimum 4 × 2 × 2 feet (1200 × 600 × 600 mm), roughly 120 gallons
- A T5 HO UVB tube plus fixture and reflector (e.g., Arcadia ProT5 D3+ 12% or 14%)
- A halogen flood basking globe (50-100 W depending on enclosure material)
- A ceramic dome fixture for the basking globe, rated for the wattage
- A dimming thermostat (Habistat, Microclimate, or Vivarium Electronics)
- A programmable timer for the lights
- Two digital thermometers with probes (one for the hot side, one for the cool side)
- A digital hygrometer (or combo thermometer/hygrometer)
- An infrared temperature gun for measuring surface temperatures
- Substrate — a natural sand/soil mix or bioactive setup for healthy dragons (paper towel for new arrivals during quarantine)
- A flat basking platform — slate, rock, or sturdy wood
- At least one hide on the cool side
- Climbing branches, logs, and rocks for enrichment and natural nail filing
- Food and water dishes (shallow, non-porous)
- Optional: a Ceramic Heat Emitter (CHE) for cold nights, plus its own on/off thermostat
Choosing the Right Bearded Dragon Enclosure
The enclosure itself is the biggest decision you’ll make, and the one with the longest-lasting consequences. Get this right, and everything else gets easier.
Tank Size: Bigger Is Always Better
The absolute minimum for an adult bearded dragon is 4 × 2 × 2 feet (1200 × 600 × 600 mm), which works out to roughly 120 gallons. Smaller enclosures simply can’t accommodate the temperature gradient and UV gradient your dragon needs to thermoregulate properly — there isn’t enough physical space for the basking zone, the cool side, and everything in between.
And if you’ve heard that babies need smaller tanks, it’s a myth. Baby bearded dragons grow fast — they’re usually full-sized by 12 months — and there’s nothing about a larger enclosure that’s harmful to them. Save yourself the cost of upgrading later and buy the right size from day one.
If you have the space, going bigger than the minimum is even better. A 5 × 2 × 2 ft (1500 mm) or 6 × 2 × 2 ft (1800 mm) enclosure gives your beardie more room to roam, better temperature gradients, and more flexibility with decor.
Glass, PVC, Melamine, or Wood?
You’ve got a few material options, and each has trade-offs:
- Glass — easy to clean and see into, but doesn’t hold heat well and can cause stress for dragons that react to their own reflection. If you go glass, cover the sides and back with reptile-safe backing.
- PVC — the current gold standard for many keepers. Lightweight, holds heat well, easy to seal for bioactive setups, and built specifically for reptiles. Brands like Zen Habitats, Custom Cages, and Dubia.com sell ready-made PVC enclosures.
- Melamine or sealed wood — holds heat the best of any option, so you can run lower-wattage bulbs. Needs proper sealing if you want to go bioactive.
- Aquariums — not suitable. Top-opening, poor ventilation, and not built for the temperature gradients reptiles need. Skip these even if they’re cheap.
Front-Opening, Not Top-Opening
Always choose a front-opening enclosure. Bearded dragons have a parietal eye on the top of their head that detects shadows and movement from above as a predator threat — so reaching in from the top startles them every time. Front-opening doors also let you avoid disturbing the lighting setup when you go in to feed or clean.
Ventilation
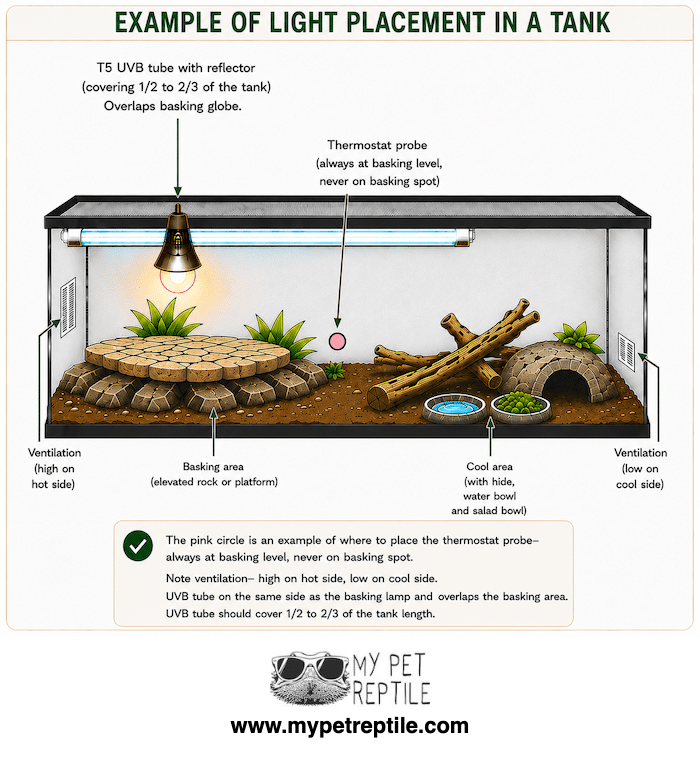
Whatever material you choose, make sure the enclosure has proper ventilation — ideally a vent low on the cool side and another high on the hot side. This creates natural airflow that keeps humidity from building up and helps prevent respiratory infections.
Lighting and Heating
Lighting is the most important variable in your dragon’s health — important enough that we’ve written a full pillar guide on it. Rather than repeating it all here, the short version is:
- A long T5 HO UVB tube covering roughly half the tank length, mounted on the hot side
- A clear/white halogen flood globe directly over the basking spot, on a dimming thermostat
- Basking surface temperature of 108°F (42°C) — measured with an infrared temp gun
- Cool side ambient temperature of 72-81°F (22-27°C)
- Lights on a timer: 12-14 hours in summer, 8-10 hours in winter
- No lights at night — only a CHE if your house drops below 50°F (10°C)
For the full breakdown — including which brands to buy, mounting distances, and the equipment to avoid — see our Ultimate Bearded Dragon Lighting Guide.
Substrate: What Goes on the Floor
Substrate is one of those topics where outdated advice runs deep. The old rule was “no loose substrate — it causes impaction.” The modern, research-backed view is different: with correct lighting and husbandry, healthy bearded dragons handle natural substrates just fine, because that’s exactly what they live on in the wild.
Field research by Dr Jonathan Howard (BeardieVet) on wild central bearded dragons in the Australian outback found their natural substrate is roughly 95.9% sand, 2.3% clay, 1.5% silt, and 0.3% gravel. That’s what your enclosure is trying to replicate.
Recommended Substrates
- Desert sand blends — purpose-made for reptiles, easy to source
- Washed play sand — dried in the sun before use, cheap and effective
- Organic screened topsoil mixed with sand — closer to what dragons walk on in the wild
- Bioactive setup — a living mix of substrate, plants, and clean-up crew (isopods and springtails). Lower long-term maintenance once established.
Whichever you choose, keep it at least 10-20 cm (4-8 inches) deep at the back of the enclosure so your dragon can dig and burrow — a natural behavior they really benefit from.
Substrates to Avoid
These should not go in a bearded dragon enclosure:
- Crushed walnut shells — sharp edges, real impaction risk
- Wood chips and bark chips — too large, swells if swallowed
- Calci-sand — clumps when wet and can cause blockages
- Kitty litter and gravel — neither is safe, neither is natural
- Reptile carpet and tile — sterile, denies natural behaviors, and reptile carpet harbors bacteria in the loops
Hides, Climbing Spots, and Decor
Once the substrate is down, it’s time to make the enclosure feel like an actual habitat rather than an empty box. Bearded dragons are intelligent animals that need physical and mental stimulation — bare tanks make for bored, less active dragons.
- A flat basking platform directly under the basking globe — slate or large rock. Make sure it’s large enough to fit your dragon’s whole body, head to tail tip.
- At least one hide on the cool side — this gives your dragon a retreat when they want to thermoregulate down or just feel safe. Particularly important during brumation.
- Climbing branches and logs at varying heights — bearded dragons love to climb, and rough surfaces naturally file their claws.
- Rocks and slate for additional basking spots and visual interest
- Safe live plants (if going bioactive) — air plants, aloe vera, callisia repens, dwarf jade, ornamental grasses, hibiscus
- Tank background — reduces reflection stress and gives a more natural feel
What you don’t need: floaties, doll furniture, hammocks pretending to be beds, soft toys, or anything else that anthropomorphizes the setup. Stick to natural materials — rocks, wood, sand, plants — that allow your dragon to express the behaviors they evolved with.
Food and Water Dishes
Keep these simple. Two shallow, non-porous dishes — one for fresh greens, one for clean water — placed on the cool side of the enclosure. Avoid deep bowls (drowning risk for babies) and porous materials like unglazed clay (they harbor bacteria).
Don’t worry if your dragon never drinks from the water bowl. Many never do, getting most of their hydration from misted salads and well-gut-loaded insects. The water still needs to be there — refreshed daily — so they have the option. VCA Animal Hospitals’ housing guidance reinforces the front-opening, properly ventilated enclosure standard.
Step-by-Step Setup: The Right Order
With all your gear ready, here’s the order to actually put everything together. Following this sequence saves you from redoing steps and lets you test temperatures properly before the dragon arrives.
- Position the enclosure. Out of direct sunlight (windows can overheat the tank), away from drafts and high-traffic areas. On a sturdy stand or surface that can hold the weight once substrate and decor are added.
- Install the lighting. Mount the T5 UVB tube along the hot side, covering about half the tank length. Position the basking globe fixture so the bulb sits above where the basking platform will go. Run the basking globe through a dimming thermostat — the UVB does not go on a thermostat.
- Set up your thermometers. Place one digital probe at basking-surface height on the hot side, and another at substrate level on the cool side. Mount the thermostat probe at basking level too.
- Add the substrate. Pour it in to a depth of 10-20 cm (4-8 inches), sloping a little deeper toward the back to give digging room. Pat it down lightly so it holds shape.
- Place the basking platform. Position it directly under the basking globe, ensuring the dragon will sit roughly 20-30 cm (8-12 inches) from the bulb when basking.
- Add hides, climbing items, and decor. Hide on the cool side, climbing branches and rocks throughout. Make sure nothing is unstable — falling decor can injure a dragon.
- Add food and water dishes. Both on the cool side, both shallow.
- Set the timer. Lights on for 12 hours to start, on a regular daily cycle.
- Run a 24-48 hour test cycle. Turn everything on and let it run. Check temperatures the next day at multiple times — basking surface, hot air, cool side. Adjust wattage, thermostat, or distance until everything sits in the right range.
Testing and Cycling Before Your Dragon Arrives
This step gets skipped more often than it should, and it’s important. Running the enclosure for 24-48 hours with everything turned on (and ideally for 3-5 days if you can) does two things: it lets you confirm that your temperatures and humidity are actually hitting the targets, and it lets the enclosure off-gas any chemical smells from the materials, fixtures, or seals.
During this period, check and record:
- Basking surface temperature: target 108°F (42°C), range 104-113°F (40-45°C)
- Hot side ambient air: 90-99°F (32-37°C)
- Cool side ambient air: 72-81°F (22-27°C)
- Humidity: 30-40% with good airflow
- Night-time ambient: 50-72°F (10-22°C) once lights go off
If anything’s outside the right range, adjust before bringing your dragon home. It’s far easier to swap a 100 W globe for a 75 W now than to do it later with a stressed beardie watching.
Common Setup Mistakes to Avoid
A few mistakes we see often enough to be worth flagging:
- Buying a tank that’s “fine for now.” Babies grow into adults in twelve months. Buy the adult-sized enclosure from the start.
- Going with a pet shop starter kit. These typically include coil UVB and undersized bulbs — you’ll end up replacing most of it. Better to buy the right gear once.
- Skipping the thermostat. A dimming thermostat is a safety device, not optional gear. Halogen globes will overheat without one.
- Using reptile carpet or tile. Easy to clean, sure, but it denies your dragon every natural behavior, and reptile carpet harbors bacteria.
- Putting decor on top of substrate rather than against the floor. If your dragon digs underneath a heavy rock, it can collapse on them. Sit rocks and logs directly on the enclosure floor with substrate piled around them.
- Skipping the test cycle. Finding out your basking spot is reading 95°F (35°C) with the new dragon already inside is a stressful way to learn.
Ongoing Maintenance
Once everything is set up and your dragon is settled in, day-to-day maintenance is fairly simple:
- Daily: fresh salad, fresh water, spot clean any poop, quick temperature check
- Weekly: deeper clean of food and water dishes, wipe down glass or PVC, check substrate condition
- Monthly: rearrange decor if you like (mental enrichment), top up substrate, check all lighting and thermostat function
- Every 6-12 months: replace the UVB tube and basking globe (write the install date on the bulb so you don’t forget)
- Every 4-6 weeks: full substrate change (less often if running bioactive)
Bringing Your Dragon Home
With the enclosure tested and dialed in, you’re ready. When your dragon arrives, give them a few quiet days to settle without too much handling — they’ve just been through a stressful transport, and a new environment takes some adjusting to. Offer food and water, keep the lights on a normal cycle, and let them explore at their own pace.
If your dragon is a new arrival from a breeder or rescue, start them on paper towel and book a vet check including a fecal test within the first couple of weeks. Once they have a clean bill of health, you can transition to your full naturalistic substrate.
Frequently Asked Questions
What size tank do I need to set up for a bearded dragon?
The minimum is 4 × 2 × 2 feet (1200 × 600 × 600 mm, roughly 120 gallons) — for adults, babies, and Rankins dragons alike. Anything smaller can’t hold the proper temperature and UVB gradient. Front-opening only — never a top-opening aquarium.
What order should I set up a bearded dragon tank in?
Build it dry first: enclosure assembled, T5 UVB and halogen flood mounted, thermostat probe positioned, ventilation panels in place. Then add hardscape — basking platform, hides, climbing branches, rocks. Substrate goes in last. Run the lights and dial in temperatures for at least 48 hours before the dragon arrives.
How much does it cost to set up a bearded dragon tank?
Plan on $800-$1,800 USD for a proper first-year setup. Roughly $300-$900 for the enclosure, $250-$500 for the T5 UVB + halogen flood + dimming thermostat bundle, $100-$250 for substrate and decor, $40-$100 for instruments (IR temp gun and digital thermometer/hygrometer). Buying right once is cheaper than upgrading every component later.
Do I need to cycle a bearded dragon tank before the dragon arrives?
Yes — but it’s a temperature and equipment check, not an aquarium-style biological cycle. Run all lighting on the thermostat for at least 48 hours. Measure basking surface temperature with an IR gun on the actual platform, air temperatures with a digital probe at basking height, and confirm the cool side stays below 84°F (29°C). Adjust wattage or lamp distance until everything reads in range.
What’s the best substrate for a new bearded dragon tank?
For a healthy adult dragon: a deep loose mix of washed play sand and organic topsoil with a touch of excavator clay (roughly 60/30/10 by volume), or full bioactive. For a brand-new arrival in quarantine: paper towel until the vet check is clear, then transition to natural substrate. Avoid reptile carpet, bark chips, walnut shells, and crushed walnut — all carry real impaction or hygiene risk.
How long should lights stay on in a new bearded dragon tank?
Replicate seasonal photoperiod: 14 hours on / 10 off in summer, 12/12 in spring and autumn, 10 on / 14 off in winter. A timer plugged into the dimming thermostat handles this automatically. Lights off entirely at night — no daytime lamp running 24/7.
Keep Reading
A few related guides that’ll help you go deeper on each part of the setup:
- The Ultimate Bearded Dragon Lighting Guide — the full deep dive on UVB, basking, and temperatures
- Are Bearded Dragons Good Pets? — an honest look at whether one is right for your life
- Bearded Dragon Food and Nutrition — feeders, salads, supplements, and feeding schedules by age
- The Bearded Dragon Beginner’s Guide — the broader starter overview
- Bearded Dragon Health and Disease — common conditions and warning signs
Join the My Pet Reptile community
If this guide helped you sort out your setup, subscribe to our newsletter for new care guides, husbandry tips, and the occasional myth-bust delivered straight to your inbox. And come share your finished enclosure in our Facebook group — there’s no better way to get feedback on your setup than from other bearded dragon owners who’ve been there. Beginners and veterans both welcome.
The information in this guide is general in nature and is not a substitute for advice from a qualified reptile veterinarian.
Sign Up for Our Newsletter